Writing a Game Boy Emulator in OCaml

Introduction
For the past few months, I have been working on a project called CAMLBOY, a Game Boy emulator written in OCaml that runs in the browser. You can try it out on the following demo page:
I included several homebrew ROMs in the demo, so please try them out (I recommend Bouncing ball and Rocket Man Demo). You can also play with it in your mobile browser as it runs at 60 FPS on recent smartphones.
Edit: As of this PR, CAMLBOY now runs on WASM via js_of_ocaml’s WASM support'!
Repository
You can find the repository here:
https://github.com/linoscope/CAMLBOY
StarForkScreenshots




Why implement a Game Boy emulator in OCaml?
Have you ever felt like the following when learning a new programming language?
- You can write simple program snippets but you don’t know how to write medium/large scale code1.
- You have studied advanced language features2 and have a rough understanding of how they work, but you don’t know how to use them in practice.
These were exactly my thoughts when I started to study OCaml seriously a few months ago. I understood the basics of the language by reading books and implementing simple algorithms, but the above two “don’t know"s prevented me from feeling like I could really write OCaml. I knew that the only way to get out of this situation was practice, so I started looking for a project to work on.
I choose a Game Boy emulator as the project for the following reasons:
- It has clear specifications, so there is no need to think about what to implement.
- It is complex enough that it cannot be completed in a few days or weeks.
- It is not so complex that it can’t be completed in a few months.
- I have fond childhood memories of playing the Game Boy.
I set the following goals for the emulator:
- Write code with an emphasis on readability and maintainability.
- Compile to JavaScript using js_of_ocaml and run it in the browser.
- Achieve playable FPS in the smartphone browser.
- Implement some benchmarks and compare various compiler backends3.
Goal of this article
This article aims to take you through the journey of creating a Game Boy emulator in OCaml.
This article is for you if you are interested in what it is like to
- Implement a Game Boy emulator.
- Implement a middle-scale project in OCaml.
- Use advanced features of OCaml in practice.
We will cover things like
- Overview of the Game Boy architecture.
- How to structure your code in a testable and reusable way.
- How to use functors, GADTs, and first-class modules in practice.
- How to find bottlenecks and improve performance.
- General thoughts on OCaml.
We will not cover things like
- Basic OCaml syntax.
- Details of the Game Boy architecture.
You can find materials about these uncovered topics in the Recommended Materials section.
Implementation
Architecture diagram
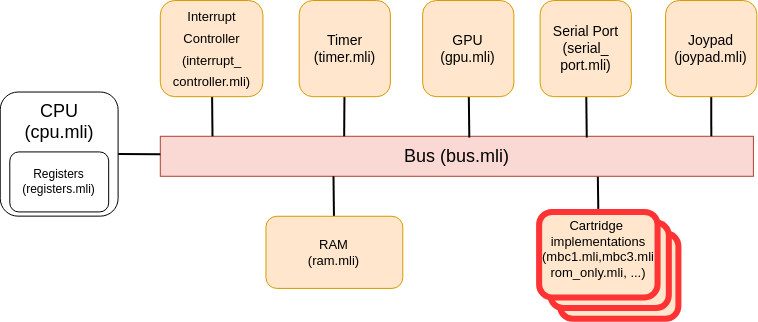
A schematic diagram of CAMLBOY looks like this:4
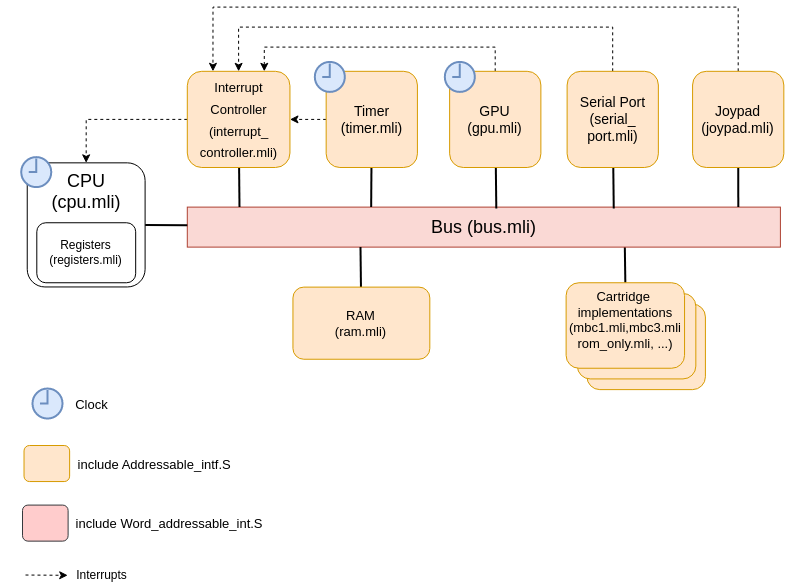
I’ll explain the details as needed, but in a nutshell:
- The CPU/timer/GPU operates at a fixed rate according to a clock.
- The bus sits between the CPU and various hardware modules and routes data reads/writes based on the given address. For example, writes to address
0xFFFFis routed to the interrupt controller and enables/disables interrupts based on the written value. - Hardware modules connected to the bus implement the interface
Addressable_intf.S(which I will explain later) - The bus implements the interface
Word_addressable_intf.S(which I will explain later) - There are various types of cartridges.
- The timer, GPU, serial port, and joypad can request interrupts. The interrupt controller will notify the requested interrupt to the CPU (further explanation of interrupts is omitted in this article).
Main loop
The main loop is responsible for progressing the clocked hardware modules (highlighted in red below) in a synchronized way.
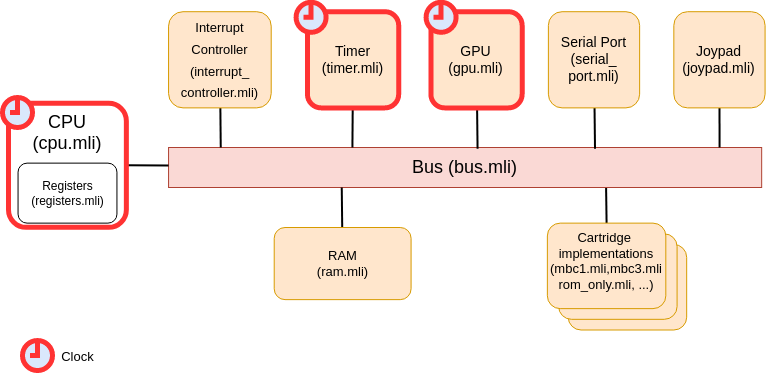
In real hardware, the CPU/timer/GPU share the same hardware clock, so they naturally run in a synchronized state. On the other hand, the emulator is just a sequential execution loop, so we need to devise a way to reproduce the synchronization between these components. To do so, I implemented the main loop to contain the following steps:
- Let the CPU execute one instruction and keep track of the number of cycles consumed as a result.
- Advance the timer by the number of cycles consumed by the CPU.
- Advance the GPU by the number of cycles consumed by the CPU.
We sometimes call this the catch up method because it makes the timer and GPU “catch up” with the CPU. Here is the implementation:
(* camlboy.ml *)
let run_instruction t =
  let mcycles = Cpu.run_instruction t.cpu in
  Timer.run t.timer ~mcycles;
  Gpu.run t.gpu ~mcycles
Interface for reading/writing data
We will look at some basic interfaces used throughout the emulator.
Interface for reading/writing 8-bit data
First, let’s look at the interface for reading/writing 8-bit data used in the red line below.
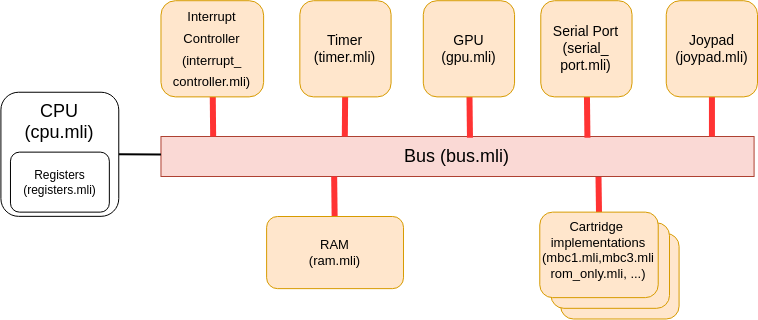
The Bus can read and write 8-bit data from various hardware modules such as GPU and RAM. Since we will be implementing many modules that can read and write 8-bit data, we’d like to share their interface in some form.
With OOP, you would
- Write an interface (
public interface A {...}in Java). - Implement it (
implements Ain Java).
With OCaml, you can
- Write a signature (
module type S = sig ... end). - Include it (
include S with type t := t).
Following these steps, we define the signature Addressable_intf.S as below5.
(* addressable_intf.mli *)
module type S = sig
  type t
  (* reads 8-bit data from address addr *)
  val read_byte : t -> uint16 -> uint8
  (* writes 8-bit data to address addr *)
  val write_byte : t -> addr:uint16 -> data:uint8 -> unit
  (* returns true if it accepts reads/writes from addr and returns false if it can not *)
  val accepts : t -> uint16 -> bool
end
Then we include Addressable_intf.S in the interface files of modules that provide 8-bit reads/writes. For example, the RAM module’s interface file ram.mli looks like this:
(* ram.mli *)
type t
...
include Addressable_intf.S with type t := t
In the same way, gpu.mli, joypad.mli, timer.mli, etc, include Addressable_intf.S.
Note
The with type t := t in the above code may need explanation. In general, A with type t := s replaces t in the signature A with s. So include Addressable_intfS with type t := t means:
replace type t in Addressable_intfS with type t in Ram, and then include (“expand” it here).
In other words, the above ram.mli is the same as the following:
(* ram.mli *)
type t
...
(* include Addressable_intf.S with type t := t will be "expanded" as the following *)
val read_byte : t -> uint16 -> uint8
val write_byte : t -> addr:uint16 -> data:uint8 -> unit
val accepts : t -> uint16 -> bool
Interface for reading/writing 16-bit data
Next, let’s look at the interface for reading/writing 16-bit data used in the red line below.
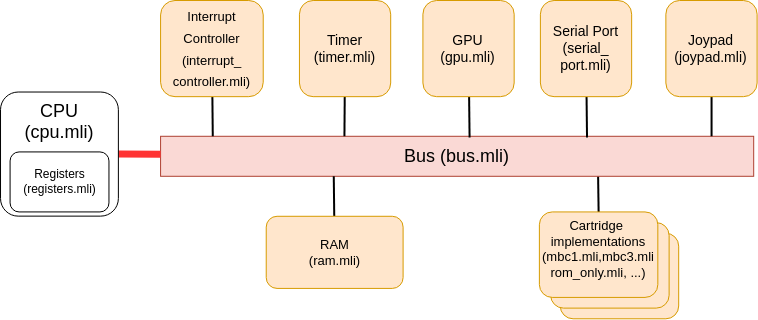
Between the CPU and the bus, in addition to 8-bit data, 16-bit data can also be read/written. To express this, it would be nice if we could somehow “extend” the interface for 8-bit data read/write (Addressable_intf.S) with 16-bit read/write functions.
In OOP, you would
- Inherit the interface (
extends Ain Java).
With OCaml, you can
- Include the signature (
include A with type t := t).
Hence to extend Addressable_intf.S with 16-bit reads/writes, we can
- Define a signature called
Word_addressable_intf.S. - Include
Addressable_intf.S - Add additional functions (
read_wordandwrite_word)
Resulting in this definition:
(* word_addressable_intf.ml *)
(** Interface that provide 16-bit read/write in addition to 8-bit read/write *)
module type S = sig
  type t
  include Addressable_intf.S with type t := t
  (* 16-bit reads/writes *)
  val read_word : t -> uint16 -> uint16
  val write_word : t -> addr:uint16 -> data:uint16 -> unit
end
The Bus
Let’s take a look at the implementation of the bus, highlighted in the red box below.
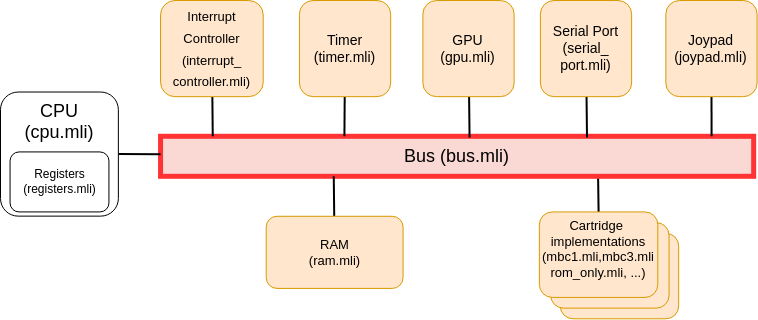
The bus sits between the CPU and various hardware modules, and routes data reads/writes based on the given address. For example, the bus routs read/write to address 0xC000 to the RAM. You can find the full memory map here
Using the Word_addressable_intf.S implemented above, we can define the interface of the bus module (bus.mli) as the following.
(* bus.mli *)
type t
val create :
  gpu:Gpu.t ->
  timer:Timer.t ->
  wram:Ram.t ->
  ... ->
  t
include Word_addressable_intf.S with type t := t
Then, we can implement the bus (bus.ml) like below:
(* bus.ml *)
type t = {
  gpu   : Gpu.t;
  timer : Timer.t;
  wram  : Ram.t;
  ...
}

(* takes the modules connected to the bus as its argument *)
let create ~gpu ~timer ~wram ... = {
  gpu;
  timer;
  wram;
  ...
}

let read_byte t addr =
  (* routes the data read to the appropriate module based on the given address *)
  match addr with
  | _ when Gpu.accepts t.gpu addr ->
    Gpu.read_byte t.gpu addr
  | _ when Timer.accepts t.timer addr ->
    Timer.read_byte t.timer addr
  | _ when Ram.accepts t.wram addr ->
    Ram.read_byte t.wram addr
  | ...

let read_word t addr =
  (* The read_word function archives 16-bit reads by calling read_byte twice.
     The actual hardware also achieves 16-bit read/write by conducting 8-bit read/write twice. *)
  let lo = Uint8.to_int (read_byte t addr) in
  let hi = Uint8.to_int (read_byte t Uint16.(succ addr)) in
  (hi lsl 8) + lo |> Uint16.of_int
Registers
Let’s take a look at the implementation of registers, highlighted in the red box below.
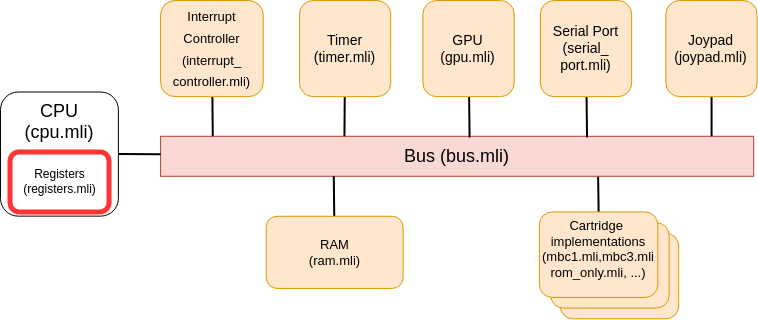
The Game Boy’s CPU has eight 8-bit registers, A, B, C, D, E, F, H, and L. These 8-bit registers can be combined to be used as 16-bit registers AF, BC, DE, and HL. Below is the interface of the Registers module (implementation is omitted):
(* registers.mli *)

type t
(* identifiers of the 8-bit registers *)
type r = A | B | C | D | E | F | H | L
(* identifiers for the 16-bit registers *)
type rr = AF | BC | DE | HL

...

(* read/write functions for the above registers *)
val read_r   : t ->  r -> uint8
val write_r  : t ->  r -> uint8 -> unit
val read_rr  : t -> rr -> uint16
val write_rr : t -> rr -> uint16 -> unit
The CPU
Let’s take a look at the implementation of the CPU, highlighted in the red box below.
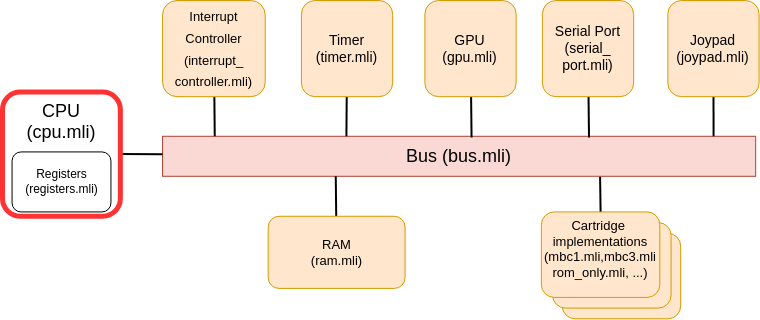
My initial implementation of the CPU
Below is my initial implementation of the CPU. Details of the execute function are omitted here and will be discussed when implementing the instruction set.
(* cpu.mli *)
type t
val create : bus:Bus.t -> registers:Registers.t -> ... -> t
val run_instruction : t -> int (* returns the # of cycles consumed *)
(* cpu.ml *)
type t = {
  registers  : Registers.t;
  bus        : Bus.t;
  mutable pc : uint16; (* Program counter *)
  ...
}

(* Initializes the CPU by passing it's dependencies *)
let create ~bus ~registers ... = {
    bus;
    registers;
    ...
}

(* Omitted for now. *)
let execute t inst = ...

(* Fetches, decodes, and executes an instruction *)
let run_instruction t =
  ...
  let inst = Fetch_and_decode.f t.bus ~pc:t.pc in
  execute t inst
The problem with the initial implementation of the CPU
The above implementation of the CPU works, but there is one problem — it is hard to test. The following diagram illustrates why:
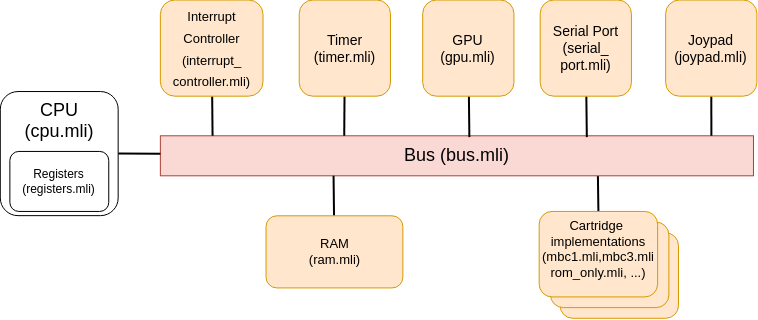
Notice that the bus has many dependencies on various modules. These dependencies make it hard to instantiate the CPU in our unit tests. Furthermore, it is impossible to instantiate the CPU until we implement the bus and all the connected modules, which would be pretty later on in the development process.
To make the CPU testable, we want to abstract away the implementation of the bus from the CPU. Once we do this, we can swap the bus with a mock implementation, as illustrated below:

In OCaml, you can achieve such abstraction of implementation using functors.
Using functors to improve testability
I have reimplemented the CPU using functors like this:
(* cpu.mli *)

(* We can now "inject" different implementations of the Bus via this functor argument *)
module Make (Bus : Word_addressable_intf.S) : sig
  type t
  ...
end
(* cpu.ml *)

module Make (Bus : Word_addressable_intf.S) = struct
  type t = {
    registers  : Registers.t;
    bus        : Bus.t;
    mutable pc : uint16; (* Program counter *)
    ...
  }
  ...
end
Thanks to this change, we can use a mock implementation of the bus to instantiate the CPU in our unit tests, as illustrated below:
(* test_cpu.ml *)
...
(* Mock_bus is a simple implementation of `Word_addressable_intf.S`
   which is implemented using a single byte array. *)
module Cpu = Cpu.Make(Mock_bus)
let cpu = Cpu.create ~bus:(Mock_bus.create ~size:0xFF) ...
...
Instruction set
Let’s encode Game Boy’s instruction in OCaml.
The instruction set of Game Boy consists of
- 8-bit instructions: takes 8-bit values (8-bit registers, 8-bit immediate values, etc.) as arguments.
- 16-bit instructions: takes 16-bit values (16-bit registers, 16-bit immediate values, etc.) as arguments.
For example, there are two versions of addition as shown below:
# 8-bit version
# Adds the 8-bit `A` register and `0x12`, then stores the result in the `A` register
ADD8 A, 0x12
# 16-bit version
# adds the 16-bit `AF` register and `0x1234`, then stores the result in the `AF` register
ADD16 AF, 0x1234
Now, how should we define such an instruction set in OCaml?
Define the instruction set using variants
As a first attempt, I represented the instructions and their arguments as variants, as shown below:
(* instruction.ml *)

(* Instruction arguments definied using variants *)
type arg =
  | Immediate8  of uint8   (*  8-bit value *)
  | Immediate16 of uint16 (* 16-bit value *)
  | R           of Registers.r      (*  8-bit register *)
  | RR          of Registers.rr    (* 16-bit register *)
  | ...

(* Instructions *)
type t =
  | ADD8  of arg * arg (*  8-bit version of ADD *)
  | ADD16 of arg * arg (* 16-bit version of ADD *)
  | ...
But I soon noticed that this approach does not work.
Problem with the definition using variants
Why does this approach not work? The problem arises when we try to “consume” the instruction set in the execute function, as shown below:
(* cpu.ml *)

(* Takes a single instruction and executes it. *)
let execute t (inst : Instruction.t) =
  ...
  let read_arg = function
    (* fetch values stored in the given argument *)
    | Immidiate8  x -> x
    | Immediate16 x -> x
    | R  r          -> Registers.read_r r
    | RR rr         -> Registers.read_rr rr
    | ...
  in
  match inst with
  | Add8 (x, y) ->
    (* Fetches the value stored in the arguments x and y adds them. *)
    let sum = Uint8.add (read_arg x) (read_arg y) in
    ...
  | Add16 (x, y) ->
    let sum = Uint16.add (read_arg x) (read_arg y) in
    ...

let run_instruction t =
  ...
  let inst = Fetch_and_decode.f t.bus ~pc:t.pc in
  execute t inst
I have extracted the read_arg function below to understand the problem. Notice that the return value of the entire function cannot be uniquely determined. This is because the return type of the match expression changes depending on which constructor it matches, as highlighted in the comments.
  (* What is the type of the return value? *)
  let read_arg : Instruction.arg -> ??? = function
    ...
    | R r  ->
      (* fetches the value of 8-bit register. *)
      (* returns uint8 in this case. *)
      Registers.read_r r
    | RR r ->
      (* fetches the value of 16-bit register. *)
      (* returns uint16 in this case. *)
      Registers.read_rr r
  in
At this point, I remembered GADT (Generalized Algebraic Data Type), a language feature that I had studied before but never really felt comfortable with.
GADTs to the rescue
Below is the redefined instruction set that uses GADTs. Notice that the definition of the arg type looks different from the previous variant definition.
(* instruction.ml *)

(* Instruction arguments definied using GADTs *)
type _ arg =
  | Immediate8  : uint8        -> uint8  arg
  | Immediate16 : uint16       -> uint16 arg
  | R           : Registers.r  -> uint8  arg
  | RR          : Registers.rr -> uint16 arg
  | ...

(* Instructions *)
type t =
  | ADD8  of uint8 arg * uint8 arg
  | ADD16 of uint16 arg * uint16 arg
  | ...
To understand the meaning of this definition, let’s focus on the third line of the arg type:
| R : Registers.r -> uint8 arg
The argument type of the constructor (Registers.r in Registers.r -> uint8 arg) has the same functionality as the of Registers.r in the variant definition. It changes the type of the value you get in the pattern match based on the constructor. In the below match statement, notice that the type of value we get in the match statement (type of r and rr) is different depending on the constructor we match. This is possible because the argument type of the constructor is different.
let read_arg = function
  ...
  | R   r -> .. (* type of r is Registers.r *)
  | RR rr -> .. (* type of rr is Registers.rr *)
  ...
Then what does the return type of the constructor (uint8 arg in Registers.r -> uint8 arg) represent? There seems to be nothing corresponding to this in the variant definition. The answer is: it changes type of the value you return in the pattern match based on the constructor. Take a look at the below match statement. Notice that the type of value we return in the match statement is different depending on the constructor we match. This is possible because the return type of the constructor is different.
let read_arg = function
  ..
  | R   r -> Registers.read_r r   (* returns uint8 *)
  | RR rr -> Registers.read_rr rr (* returns uint16 *)
  ...
In summary, variants can parametrize the type of values we get in the match statement, while GATDs can also parameterize the type of the value we return in the match statement. In this sense, GADTs are more “general” than variants, which I guess is where the name “Generalized” Algebraic Data Type comes from.
Using the newly defined Instruction.arg, which uses GADTs, we can write execute as below. The type 'a Instruction.arg -> 'a of read_arg indicates that the return type changes based on the type of the given constructor.
let execute t (inst : Instruction.t) =
  ...
  let read_arg : type a. a Instruction.arg -> a = fun arg ->
    match arg with
    | Immediate8  n -> n
    | Immediate16 n -> n
    | ...
  in
  match inst with
  | Add8 (x, y) ->
    let sum = Uint8.add (read_arg x) (read_arg y) in
    ...
  | Add16 (x, y) ->
    let sum = Uint16.add (read_arg x) (read_arg y) in
    ...
For refrence, here is the full instruction set defined using GADTs (click to expand):
type _ arg =
  | Immediate8  : uint8        -> uint8  arg
  | Immediate16 : uint16       -> uint16 arg
  | Direct8     : uint16       -> uint8  arg
  | Direct16    : uint16       -> uint16 arg
  | R           : Registers.r  -> uint8  arg
  | RR          : Registers.rr -> uint16 arg
  | RR_indirect : Registers.rr -> uint8  arg
  | FF00_offset : uint8        -> uint8  arg
  | FF00_C      : uint8 arg
  | HL_inc      : uint8 arg
  | HL_dec      : uint8 arg
  | SP          : uint16 arg
  | SP_offset   : int8         -> uint16 arg

type condition =
  | None
  | NZ
  | Z
  | NC
  | C

type t =
  | LD8   of uint8 arg * uint8 arg
  | LD16  of uint16 arg * uint16 arg
  | ADD8  of uint8 arg * uint8 arg
  | ADD16 of uint16 arg * uint16 arg
  | ADDSP of int8
  | ADC   of uint8 arg * uint8 arg
  | SUB   of uint8 arg * uint8 arg
  | SBC   of uint8 arg * uint8 arg
  | AND   of uint8 arg * uint8 arg
  | OR    of uint8 arg * uint8 arg
  | XOR   of uint8 arg * uint8 arg
  | CP    of uint8 arg * uint8 arg
  | INC   of uint8 arg
  | INC16 of uint16 arg
  | DEC   of uint8 arg
  | DEC16 of uint16 arg
  | SWAP  of uint8 arg
  | DAA
  | CPL
  | CCF
  | SCF
  | NOP
  | HALT
  | STOP
  | DI
  | EI
  | RLCA
  | RLA
  | RRCA
  | RRA
  | RLC   of uint8 arg
  | RL    of uint8 arg
  | RRC   of uint8 arg
  | RR    of uint8 arg
  | SLA   of uint8 arg
  | SRA   of uint8 arg
  | SRL   of uint8 arg
  | BIT   of int * uint8 arg
  | SET   of int * uint8 arg
  | RES   of int * uint8 arg
  | PUSH  of Registers.rr
  | POP   of Registers.rr
  | JP    of condition * uint16 arg
  | JR    of condition * int8
  | CALL  of condition * uint16
  | RST   of uint16
  | RET   of condition
  | RETI
The Cartridges
Let’s look at the implementation of the cartridges, highlighted in the red box below.
You might think that Game Boy cartridges are just a ROM (read-only memory) that stores game data/code, but this is not the case. Many Game Boy cartridges contain hardware components to enhance the Game Boy’s limited functionality. For example, while ROM_ONLY type cartridges (such as Tetris) only include the ROM that stores the game data/code, MBC3 type cartridges (such as Pokémon Red) contain independent RAM and timers in addition to the ROM.
Since each cartridge type has separate functionality, we will implement each cartridge type as individual modules. Therefore, we need a mechanism to select a module according to the cartridge type at runtime.
First-class modules are helpful for this kind of “runtime module selection”. As shown below, you can write Detect_cartridge.f that returns a first-class module based on the cartridge type. We will omit the implementation in this article.
(* detect_cartridge.mli *)
val f : rom_bytes:Bigstringaf.t -> (module Cartridge_intf.S)
Integration tests
I used test ROMs and ppx_expect to catch regressions and to enable exploratory programming.
What are test ROMs
Test ROMs are programs that test certain functionality of the emulator. For example, there are test ROMs that:
- Test if the basic arithmetic instructions are working as expected.
- Test if the MBC1 cartridge type is adequately supported.
Such test ROMs are extremely helpful when developing emulators since, unlike game ROMs, they
- Indicate which aspect of the emulator is failing.
- Runs even if some core functionality of the emulator is missing.
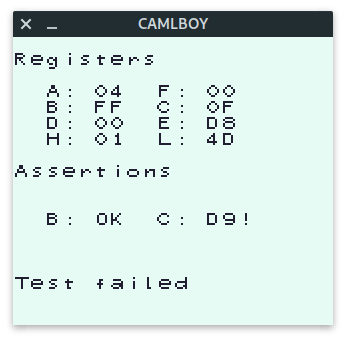
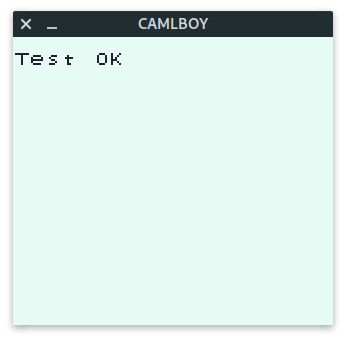
Test ROMs typically output the test results to the display6. For example, mooneye test ROMs results look like below. The text displayed in the failure case is the register dump and assertion failure information.
Setting up the tests
Below is an example integration test implemented using a test ROM and ppx_expect. Here is what is happening:
M.run_test_rom_and_print_framebufferruns the given ROM and prints the final state of the screen in ASCII characters.- The printed string is matched with the
...in[%expect{|...|}].
Details about ppx_expect can be found in this article.
let%expect_test "bits_mode.gb" =
  M.run_test_rom_and_print_framebuffer "mbc1/bits_mode.gb";

  [%expect{|
    008:-#######-----------------------------------###---#---#----------------------------------------------------------------------------------------------------------
    009:----#-----####-----###-----#--------------#---#--#--#-----------------------------------------------------------------------------------------------------------
    010:----#----#----#---#-------####------------#---#--#-#------------------------------------------------------------------------------------------------------------
    011:----#----######----##------#--------------#---#--###------------------------------------------------------------------------------------------------------------
    012:----#----#-----------#-----#--------------#---#--#--#-----------------------------------------------------------------------------------------------------------
    013:----#-----####----###------##--------------###---#---#---------------------------------------------------------------------------------------------------------- |}]
These integration tests gave me the confidence to make large code changes as the test suit would catch regressions.
Exploratory programming
Furthermore, these integration tests enabled me to implement the emulator in a exploratory programming style. Whenever I would implement new functionality, I would
- Find a test ROM that checks the functionality.
- Set up
ppx_expecttests that run the test ROM. - Run the tests and commit the failed output.
- Implement the functionality.
- Check if the test changed to the “Test OK” state.
Compiling to JavaScript
Compiling to JavaScript was surprisingly easy thanks to js_of_ocaml. I was able to get the emulator working in the browser with just a single commit.
I used a library called Brr when implementing the browser UI. The great thing about Brr is that it maps JS objects to OCaml modules, unlike js_of_ocaml ’s built-in browser API that maps JS objects to OCaml objects, requiring some knowledge about the “O” in OCaml.
Optimization
Although I was able to get it working in my browser, it had one problem — it was unplayably slow. Below is how it looked like in the PC browser at this point, running at around 20 FPS. The actual Game Boy runs at 60 FPS, so we need to improve the performance by a factor of three.

Now started the journey of optimization.
Finding bottlenecks with a profiler
The first thing I did was use Chrome’s profiler7 and find out the bottlenecks. Here are the results:
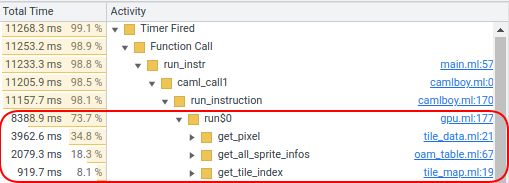
The above show that the GPU consumes ~73% of the time, with tile_data.ml, oam_table.ml, and tile_map consuming 34%, 18%, and 8% of the time, respectively.
Similarly, I found that timer.ml and some Bigstringaf functions were consuming a lot of time.
Removing the bottlenecks
Now that I knew where the bottlenecks were, I worked on removing them. Since this article does not cover the parts that these changes touch, I will only list what I optimized and their results.
- Optimize
oam_table.ml(commit):- 14fps -> 24fps
- Optimize
tile_data.ml(commit):- 24fps -> 35fps
- Optimize
timer.ml(commit):- 35fps -> 40fps
- Optimize
tile_map.ml(commit):- 40fps -> 50fps
- Use
Bigstringaf.unsafe_getinstead ofBigstringaf.get(commit):- 50fps -> 60fps
Disabling inlining
At this point, the emulator was running at 60 FPS on my PC browser, but only at 20~40 FPS on my phone. As I wondered what to do, I realized that the JS output from the release build was slower than the JS output from the dev build. With the help from people at discuss.ocaml.org, we found that js_of_ocaml’s inlining was slowing down the JS performance8. (Update 2022-01-12: The negative impact of inlining is being addressed in ocsigen/js_of_ocaml#1220.)
After disabling inlining, I achieved 100 FPS on my PC and 60 FPS on my phone. Below is the gif of the emulator running in 100 FPS in the PC browser.

As a side note, optimizing the JS performance also improved the native performance. Below is the emulator running in ~1000 FPS in native.

Some benchmarks
I implemented a headless benchmarking mode to run the emulator without UI. I measured the FPS in various OCaml compiler backends, and the result was as follows:9

Final remarks
Thoughts on emulator development
I found emulator development to be similar to competitive programming. They both proceed through an iteration of the following steps:
- Read the specification — the problem statement in competitive programming and the manuals/wiki pages in emulator development.
- Implement according to the specification.
- Check whether the implementation satisfies the specification — submitting to an online judge in competitive programming and running test ROMs in emulator development.
In the past, I have recommended competitive programming to people (like me) who want to code but have a hard time thinking of what to implement. In the future, I would also recommend emulator development to such people.
Things I liked about OCaml
The ecosystem
The ecosystem of OCaml has improved a lot since the last time I touched OCaml (around six years ago). To list a few examples:
- Thanks to dune, we now have the “just throw the files in the directory, and the build system will do the rest” experience, which is becoming the norm in modern programming languages.
- Thanks to software such as Merlin and OCamlformat, introducing autocomplete, code navigation, and autoformat is mostly effortless.
- Thanks to setup-ocaml, we can set up Github actions that builds and test your code by just committing a single file.
If you tried OCaml a few years ago but left because of the ecosystem, you should give it another shot.
Doesn’t have to be “functional” to be useful
A functional language is often defined as “a language that supports a programming style that uses as few side effects as possible”, but I have always felt uncomfortable with this “side effects” part. I am not saying that the definition is wrong; I just never thought side effects themselves were a huge problem. An exposed mutable state is bad, but isn’t it OK if hidden behind an abstraction?
In fact, the implementation of CAMLBOY has mutable states everywhere for performance reasons. Many modules have functions with the type t -> ... -> unit, which indicates modification of some mutable state. And despite this non-“functional” implementation, I never felt that I was missing out on the benefits of OCaml.
Maybe it’s not that I like “functional” languages; I like statically typed languages with variants, pattern matching, a module system, and nice type inference.
Things I didn’t like about OCaml
The ecosystem
Although the ecosystem has significantly improved, some things still feel complex or poorly documented. For example, I had trouble resolving dependencies in a reproducible way as there seemed to be no clear instructions in the official opam document. I ended up reading the source of setup-ocaml to find out the required commands, and the commands I found felt a little complex (we need to “publish” the package locally, then install the locally published package). It would be super nice if there was a single command that resolves the dependencies and builds the code in a reproducible way.
The syntactical cost of depending on abstractions
OCaml has a high cost of “depending on abstractions”. Let me illustrate what I mean with an example.
Suppose we have modules A, B, and C with the dependency A -> B -> C (A references B which references C), as shown below.
module A = struct .. B.foo () .. end
module B = struct .. C.bar () .. end
module C = struct .. end
Say you want to break the hard-coded dependency between B and C. In other words, you want to make B depend on the C ’s interface and not C ’s concrete implementation. You will want to do this, for example, if you want to swap C with a mock implementation in the unit test of B. You can do this with the following steps:
- Extract the interface of
Cinto a signature calledC_intf - Define
Bas a functor that takesC_intas an argument
The result of these changes should look like the following. Notice that B is now a functor that takes a module that satisfies C’s interface C_intf.
module A              = struct .. B.foo () .. end
module B (C : C_intf) = struct .. C.bar () .. end
module C              = struct .. end
But this won’t compile because B referenced in A is now a functor and not a module. Therefore, we need to repeat the above steps and abstract away B from A like this:
module A (B : B_intf)          = struct .. B.foo () .. end
module B (C : C_intf) : B_intf = struct .. C.bar () .. end
module C                       = struct .. end
Let’s see what happened here in detail. Any module have two types of dependencies:
(a) How the module depends on other modules
(b) How the module is depended on by other modules
The motivation for converting a module into a functor is to change (a), but converting a module to a functor also changes (b). In other words, converting a module to a functor not only changes how the module depends on other modules, but it also changes how it is dependend on by other modules.
This will be a bigger problem if many modules depend on B or if we have a deeper dependency graph.
Note that this won’t happen in the OOP paradigm. Changing class B ’s constructor to take an interface C_intf instead of a concrete class C will not change the type of class B itself.10
While working on CAMLBOY, I ran into this problem when I tried to make the cartridge implementation switchable at runtime (I had the dependency graph of Camlboy -> Bus -> Cartridge and wanted just to decouple the Bus -> Cartridge part).
Recommended Materials
About OCaml
- Learn OCaml Workshop
- I highly recommend this workshop material used (used to be used?) within Jane Street. It consists of OCaml code with holes and tests that require filling the holes to pass, so you can learn the basics of OCaml efficiently in a hands-on way. The second half of the book deals with pretty complex programs such as Snake and Lumines, so you can learn how to separate modules effectively, how you can use the build system, etc.
- Real World OCaml
- I recommend this book if you know the basic syntax of OCaml or have experience in other functional languages. It introduces the knowledge needed to write “real world” programs in OCaml with practical examples.
About Game Boy
- The Ultimate Game Boy Talk
- This is a great video that explains the whole Game Boy architecture in just one hour. I’ve watched it countless times during the course of development.
- gbops
- A table of Game Boy’s instruction set. Information necessary for decoding instructions is summarized here.
- Game Boy CPU Manual
- CPU manual. I used this manual to implement the instructions. Note that some parts (especially around the register flags) are incorrect.
- Pandocs
- A wiki with details on how each hardware module should work. I constantly referenced this wiki while implementing GPU, Timer, etc.
- Imran Nazar’s blog
- A tutorial on how to implement a Game Boy emulator in JavaScript. I read it to get a rough understanding of what to implement.
The rough definition of “medium/large scale code” here is “code that is difficult to develop without tests, and as a result, must be designed in an easily testable way”. Writing easily testable code is a topic rarely mentioned in introductory books but is essential in practice. ↩︎
By “advanced language features”, I’m thinking of OCaml’s functors, GADTs, first-class modules, etc. ↩︎
Emulators are a somewhat popular benchmark target among various languages/runtimes. For example, an NES emulator is used in the Ruby world to benchmark different Ruby runtimes, and the Chrome team seems to have used a Game Boy emulator for benchmarking their JS engine. ↩︎
Note that this is a sketch of my implementation and NOT a sketch of the actual Game Boy hardware. Also, I omitted components that I haven’t implemented yet, such as APU (Audio Processing Unit), from the diagram. ↩︎
The
uint8anduint16in the code are not OCaml built-in types but are types from a custom unsigned int module (units.mli,units.ml). ↩︎Some test ROMs, such as blargg test roms, output the test results to the serial port as ASCII characters. This enables testing the emulator even before implementing the GPU. ↩︎
Being able to use Chrome’s profiler was a nice side effect of compiling to JS. ↩︎
This is probably because the emulator contains some long functions and the JS engine doesn’t JIT compile when a function is too long. ↩︎
Note that we can not use this benchmark to compare the FPS with other Game Boy emulators. This is because the performance of an emulator depends significantly on how accurate it is and how much functionality it has. For example, CALMBOY does not implement the APU (Audio Processing Unit), so there is no point in comparing its FPS with emulators with APU support. ↩︎
But OOP comes with the cost of dynamic dispatch, which may or may not be a problem depending on your use case. Also, although OCaml supports OOP, using them might limit the readers of your code since many people (including myself) are unfamiliar with the OOP aspect of OCaml. ↩︎